|
If you're like most of us, the
thought of installing a multi-camera security system sounds
daunting and something best reserved for professional
installers.
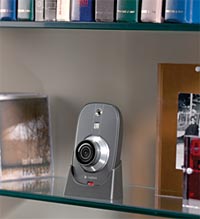
Happily, the Logitech Alert
system is very easy to install - even I did it with a minimum of
fuss and bother. This is because you don't need to add
extra wiring, and because the cameras themselves can be
freestanding if you don't want to drill holes in walls and add
special mounting brackets.
Indeed, as the picture above
shows, they blend nicely in with the rest of your home.
Adding Extra Cameras
Most people will probably
choose to have at least a two camera system (ie one internal and
one external), although if you're in an apartment complex with
few vulnerable exterior walls/approach paths, you might settle
for just one or two internal cameras and no external cameras.
The system can be grown to
handle up to six cameras. In theory, it would be possible
to add still more cameras (and of course Logitech would make
more money if they sold you more cameras), but in practice there
are several limitations on this.
One is the bandwidth
required, both within your LAN and externally to the internet,
to support multiple video streams simultaneously. A
surprising other limitation is the processing power of your
computer's CPU - it is a processing intensive task to be
displaying multiple video streams simultaneously and few of the
current crop of computers could handle more than six video
streams without massively impacting on their performance for
everything else you want your computer to do at the same time.
There's also an underlying
paradigm issue as well. This is intended to be a home
security system, offering reasonable capabilities and
performance at a high value price point. Re-read our
related article on How to Set Up
a Home Security Video System to better understand how many
cameras you really/truly need for effective monitoring and
timely detection of breakins.
If you truly need more than
six cameras to protect your house, you probably also truly need
a fully professional grade security system, probably costing ten
or more times as much as the Logitech Alert.
Installing the Cameras
Installing the cameras is
much easier than I feared it might be. You have various
different options for where and how you can mount the cameras -
either from the top or bottom, and the camera itself can be
upside down or the right way up (you can compensate for this in
the camera's software setup). There are plenty of
different bits of mounting hardware to make it easy for you to
affix the cameras either temporarily or permanently to the
places you select.
An option for the internal
cameras is to stick them to a glass surface using nothing more
than a suction cup. Logitech assure me that they've done
tests with objects weighing a great deal more than a camera that
have remained safely suspended for more than six months beneath
one of their suction cups, so as long as you make sure the glass
(and the cup) are very clean, and you slightly moisten the cup,
it should be okay to mount a camera that way. If you do,
I'd recommend you make a calendar entry perhaps repeating every three months,
reminding you to
remove, reclean and reaffix the suction mount.
Logitech also tell me their
cameras are 'drop resistant' for reasonable distance drops, in
theory, worst case scenario, you (and your camera) should be
okay if the suction cup does fall off.
Wiring the Cameras
Once you've mounted each
camera, you then need to run a combined data/power cable between
the camera and a box you plug into a wall power socket.
The cable is a standard ethernet type cable with RJ45 connectors
on both ends which uses the 'Power over Ethernet' protocol.
Internal cameras come with a
10 ft cable, external cameras come with a 20 ft cable.
If you need a longer run, Logitech sell longer 50' and 100' ft cables
made with a small low
profile flat ribbon type cable (the same as the shorter cables
supplied in their kits) which makes it easier to route the
cable. Alternatively
you could use any regular Cat-5, Cat-5e or higher classification Ethernet cable as well, but it will be
bulkier.
The box you plug into a wall
socket is a combined power supply/transformer and also a special
data transceiver that converts the signal from the camera to a
type of data transmission that works over mains power wires -
what is known as the HomePlug AV standard.
This means you don't have to
worry about any extra wiring through your house.
At some point, probably next
to your home's LAN router, you have a companion box that you
plug into a wall power socket, and you run a (supplied) 10'
cable from that to the router. This box converts the data
signal back from the mains power cabling, and allows you to get
your cameras online and onto your local home network (and also
on to the broader internet as well for remote monitoring).
HomePlug AV devices can
communicate with each other over about a 200 yard length of
wiring, although this range depends massively on how your home
wiring is laid out and what types of other ordinary devices are
also connected to it.
It is hard to think of a
house that needs more than 200 yards of wiring length from one
end to another, but if for whatever reason you find yourself
with range problems, you can simply mix and match some parts of
the camera to router distance with ethernet cabling and some
parts with HomePlug AV wiring.
So mounting and wiring is
extremely simple, with very few constraints and a minimum amount
of wiring. Overall, you should never
have a range or wiring problem in your home.
A related advantage is that
it is easy to relocate your cameras in the future. Maybe
you add another camera and then are able to adjust the locations
of the other cameras. Or maybe you decide, after some time
testing your layout, that the original locations weren't ideal.
It is easy to simply move the cameras somewhere else and re-plug
them into your home mains wiring.
Other types of security
camera systems might use Wi-Fi to broadcast their signals, but
this will probably end up with no greater range due to the
presence of walls, floors, ceilings, and other signal
obstructions. Some other types of security
cameras actually require a physical cable to run all the way
from each camera to the central monitoring control box; this
requires a potentially massive investment in running new wiring
through your walls, gives you no flexibility for future
adjustments to where your cameras are located, and so is by far the least satisfactory method.
System Works With No Computer
Although we were worrying in
the section about How to Set Up
a Home Security Video System about thieves stealing the
computer on which you are storing the camera video clips and
which is used to manage your Logitech Alert system, a positive
feature of the system is that it will work perfectly well with
no computer present (or switched on).
Because the cameras have
built in intelligence which causes them to know how to 'talk' to
Logitech's central servers, once you have set them up, they know
how to 'phone home', via the internet and through Logitech's
central servers, and on to your various contact devices such as
by email and text message, and you can in turn get back in touch
with the devices through Logitech's servers without needing any
special home LAN to be running.
This is definitely a plus if
you don't like to leave a lot of computers running 24/7, or if
your only home computer is a laptop which you take with you when
traveling.
Using the Logitech Alert
System
Using the system is simple
and straightforward. Load the software onto your Windows
based PC (there is not currently a Mac version although Logitech
acknowledges the need for adding a Mac product in the future);
mount and connect your cameras, and that is about it.
You'll then want to run the
Logitech Commander software and configure your cameras. It
is possible to electronically zoom, pan and tilt the fixed
camera so as to selectively capture only part of the very
wide-angle (140° lens) field of view the cameras have. But
be aware that if you do this, you'll be experiencing something
like the 'digital zoom' on a camera - you are simply multiplying
the available pixels to make up for the missing ones, you're not
actually increasing the resolution as you would with optical
zoom.
From that perspective, maybe
it is best not to zoom, pan or tilt the cameras at all, and
instead adjust/limit the part of the image you are using for the
motion detection zone or zones.
You'll also want to set up
the motion detection logic, specifying with parts of the image
the camera should 'look at' for motion, how sensitive to motion
the camera should be, and how long it needs to see sustained
motion before sounding an alert.
For a full discussion on how
to set your cameras up for motion detection alerts, see our
related article 'How to Best Set Up Video Monitoring at Your
Home'.
Accessing Logitech's Customer
Support
Logitech provide excellent
customer support, Monday - Friday 6am - 6pm PST plus Saturdays
and Sundays, 7am - 5pm. The weekend support is invaluable,
allowing you to make setting up and resolving any issues with
your system a weekend project.
I placed a test call with a
semi-invented question. I was quickly routed through to a
regular American, Andrew, with no time on hold. He spoke
clearly and understood my question, and showed technical
competence with the product in answering it and walking me
through the solution.
Part 3 of a four part
series on home security/video monitoring systems; please
also visit
1.
How to Best Set Up Video
Monitoring at Your Home
2. Logitech Alert 750
review part 1
3. Logitech Alert 750
review part 2
4. Logitech Alert 750
review part 3
|
If so, please donate to keep the website free and fund the addition of more articles like this. Any help is most appreciated - simply click below to securely send a contribution through a credit card and Paypal.
|
Originally published
19 Nov 2010, last update
21 Jul 2020
You may freely reproduce or distribute this article for noncommercial purposes as long as you give credit to me as original writer.
|