ScanGauge II with X-gauge Review
Lots of fascinating - and money saving - information for the
driving enthusiast
|
|
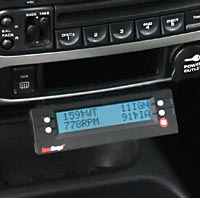
The small ScanGauge can
be mounted just about anywhere around the driver's position
in your car.
Although, please note, the position illustrated here is not
recommended - it requires you to take your eyes too far off
the road to look at it (but it looks good in the promo
photo!). This
promo picture shows the ScanGauge displaying water
temperature, ignition advance, rpm's, and incoming air
temperature. Many other types of information can also
be displayed. |
Here's a great device that is
useful (and fun) in a number of different ways.
It may save you money by
telling you why your 'Check Engine' light is on (and enabling
you to turn it off by yourself if you choose).
It can help you save money a
different way by giving you a range of information about your
vehicle's fuel economy, helping you to modify your driving style
for most economic benefit.
And it can give you a lot of
information about the vehicle's engine and operation, together
with a comprehensive set of 'trip computer' type functions.
The unit is moderately priced
($159.95 on
Amazon)
and very easy to install.
Recommended for gadget and
driving enthusiasts.
An Explanatory Introduction
about OBDII and what the ScanGauge can do
Did you know your car has a
computer inside it that is continually monitoring, managing, and even
recording many different pieces of data to do with the
operation of the engine and your driving of the vehicle?
Much of what this computer
does occurs in the background, and you never really need to know
about its operation. It is adjusting the mixture of fuel
and air that goes into the engine, advancing/retarding the
ignition timing, and generally optimizing the engine's operation
for maximum efficiency.
It is also quietly
monitoring anywhere from a dozen to many dozens of different
functions and features in the engine system, and in particular,
in its emission control systems, looking for
problems or failures. If it spots any such issues, it will
typically turn on your 'Check Engine' light, which sooner or
later will guilt you into taking your car to the dealership and
having it diagnosed and repaired.
The most interesting part of
this computerization is that, per US federal law, all cars manufactured
in and after 1996 must have an output port to allow for anyone
to connect a diagnostic or other display/monitor/analyzer to the
computer to read and track its functioning. This output
port must be in the passenger compartment and relatively close
to the steering wheel.
The same requirement
generally applies to Canadian vehicles too, and European
vehicles (in Europe) also have a similar specification.
OBDII (OBD-II or OBD II or
OBD2)
This requirement is called
the On Board Diagnostics 2 standard (usually abbreviated as
OBDII or OBD-II or OBD II or, less commonly OBD2). It is
given the number 2 because there were a couple of earlier
semi-standards partially adopted by some vehicle manufacturers,
generally called the OBD I and OBD 1.5 standards.
Implementation of the OBDII
standard had started prior to the 1996 mandate (indeed,
the first car with a computer came out in 1975, with
increasingly sophisticated car computers being installed during
the 1980s and early 1990s), so if you have an earlier model year
car, it may have an OBDII connector block and may provide data
in one of the several OBDII compatible modes.
The OBDII standard is a
combination of a specification requiring a particular size and
shape of physical data
connector to be present in the car, together with the ability of
the data connector to provide access to the car's computer system(s),
which are, for some key things, expected to communicate in a
semi-standard manner.
Beyond this 'standard' there are a number of
different methods that the computers can provide the data to a
connected monitoring device, and the data itself is not
necessarily the same for all makes and models of vehicles.
How to use the OBDII data
Devices that can read and
monitor the data stream from your vehicle's computer system(s)
(your car might have multiple computers, or perhaps just one)
can do one or more of several different things.
-
They can detect and alert you
to engine problems - giving you more detailed
information when the Check Engine light illuminates.
-
They can be used
to reset (ie turn off) the Check Engine light, something you
might choose to do if you decide the underlying reason for
the problem is unimportant and not requiring immediate
action.
-
They can provide
instantaneous reporting on various engine operating
parameters, ranging from vehicle speed to engine workload,
from engine temperatures to fuel consumption.
-
They can also be used for
'trip computer' measuring of such things as average miles
per gallon since last reset, average/maximum speed, distance
traveled, time elapsed, and so on.
Compatibility
Some car manufacturers have
delighted in attempting to make their data as difficult to
understand and decode as possible; so as to
require you to get your vehicle serviced at their dealer
franchise facilities
rather than at any generic garage/workshop. But most auto
manufacturers have settled into one of several different methods
of data presentation, and in addition to their own proprietary
data readers, it is increasingly common to find generic data
readers that can retrieve and display basic data from most if not
all modern vehicles.
The one remaining point of
confusion can be that after successfully retrieving and decoding
a piece of data, one has to then understand what it means.
It is all well and good to determine that the reason your Check
Engine light is on is due to trouble code P0172, but if you
don't know what P0172 means, you're not really much better off
than you were before.
Fortunately we have the
internet to thank, yet again, for the proliferation of a number
of good websites (links below) that will tell you the detailed meaning of
many/most of the codes from most of the vehicle manufacturers.
So, the world wide web is not just an excellent place for
playing online
casino and other virtual games - it can really help
motorists too.
Lemur SafeDriver
One other device that makes
use of the OBD-II data port and data stream is the
Lemur SafeDriver unit.
This very moderately priced unit ($70 list, $56 street) is an
elegant and easy way to monitor someone's driving.
Please see our full review for
more details.
The ScanGauge II
The ScanGauge II is one of
the most reasonably priced units that can be attached to your
vehicle's OBDII port and which can be used for all the four
purposes listed above.
It is full featured and
works with almost all vehicles and the various different methods
they have of presenting data to the OBDII port, including the
latest CAN specification (an enhancement of the earlier OBDII
specification).
The ScanGauge II - What You Get
The ScanGauge II is simply
packaged inside an attractive cardboard box, and is easily
opened.
Inside the box is the unit
itself, a small manual, a connecting cable, and two sets of
male/female adhesive Velcro pieces for you to use in mounting
the unit within your vehicle.
The ScanGauge itself
measures 4.8" x 1.5" high and is about 1" deep. It
requires a single cable connection, and very thoughtfully, is
designed with a connector both on the back of the unit and on
the side of the unit, giving you more flexibility in terms of
where and how you locate the unit and run the cable between it
and the car's OBDII data port.
The connecting cable is 6'
long, and has the proper plug at one end to connect into your
vehicle's OBDII port, and an RJ45 type connector to plug into the unit at
the other end. This has always been long enough in the
various vehicles I've had my unit (remember that part of the OBDII specification requires the port to be located close to the
driver's area of the vehicle).
The small manual measures
4¼" x 5½" and has has 32 pages of information inside. It is fairly basic
in terms of layout, but is well written and easy to follow.
Best of all, the unit is so easy and simple to understand and use you'll
soon find you don't need to refer to the manual much (other
than to remind yourself what some of the gauges are for!).
The unit requires no
batteries or separate power connection. In a manner
similar to a USB connection, it draws the power it needs through
the OBDII cable and from the vehicle. This does mean that
it only works when the vehicle is switched on, but, if you think
about it, there's not much you'd want to use an engine
monitoring unit for when the engine is switched off!
The unit comes with a 30 day
money back guarantee and a one year warranty.
Installing the ScanGauge II
Installing it was very quick
and easy. The hardest part is sometimes finding where the
OBDII port is - some vehicles place this in a discreet and
non-obvious location, other vehicles have it clearly visible
once you know what you're looking for.
The first time, I simply
called up my dealership and asked them where the port was, and
the service writer was able to immediately tell me exactly where
to find it.
The most important part of
installing the unit is choosing were to put it. I got it
wrong the first time, because I wasn't sitting in my normal
driving position while moving around finding somewhere to place
it, and what looked like a good place when I was sitting up and
forward ended up being obscured by the steering wheel when I was
in my normal driving position. Ooops! Fortunately
the velcro adhesive hadn't yet fully 'cured' (ie set) so I
quickly pulled it off the dash and moved it somewhere else that
worked better.
The velcro adhesive
installation method works only moderately well. The unit
itself is very light (it weighs 2.6 ounces) so this provides a
perfectly secure mount. But it means when you push a
button on the front of the unit, the unit rocks back on the
velcro, and it also limits where you can place the unit - if you
have a sloping dash, the slope might make the unit face in the
wrong direction. On the other hand, a unit attached by
velcro is less obvious from the outside, and therefore less
likely to attract the unwanted attention of car prowlers.
It is possible to have the
velcro mounting on either the bottom, back, or top of the unit,
giving you more flexibility.
Even so it would be nice to
have a windshield mount as well, to give more flexibility in
placement and to provide a more solid mount for when pushing the
buttons.
Then I simply ran the cable
from the OBDII port to the unit, squeezing it into craps and
gaps in the dashboard trim, and, within literally a very few
minutes of starting the process, the unit was installed and
operational.
Get a second data cable
Here's a useful tip - buy a
second data cable. That way, if you plan to use the unit
primarily in your main vehicle, but secondarily in other
vehicles, and sometimes use it in friends' vehicles too when
helping them diagnose and turn off their Check Engine lights
(you'll be amazed how many people will ask you to connect to
their car when they discover you can test and reset their Check
Engine light!),
you don't need to disconnect and unroute the cable you've
installed in your main vehicle. You simply remove the unit
off its velcro base, unplug the cable from behind the unit, and
off you go to the other vehicle.
This makes it easy and
simple, and even easier and simpler when you return it back to
your main vehicle.
A second data cable lists
for
$19.95 and costs $12.95 from Amazon.
Calibrating the ScanGauge II
Much of what the unit does
is instantly ready as soon as you connect the unit to your
vehicle, and is as correct as the data it is receiving
from your vehicle's computer system, with no need for
calibration or adjustment.
But if you want to
get accurate data on speed, distance, and fuel usage, you'll
need to calibrate the unit.
Calibrating for Speed
This is very simple.
To calibrate for speed, you drive your vehicle at a known speed
and then switch the unit to display what it thinks is your
current speed. If the unit is wrong, you simply push an Up
or a Down button until you get it showing the correct speed.
Here's a tip when
calibrating the speed. Drive your vehicle as fast as is
legal and safe, because a small change in speed displayed
is a finer adjustment at higher speed than if you are going very slowly.
Any sort of speed measuring/calculating is probably never more
accurate (or displayed more accurately) than perhaps 1 mile per
hour. So, if you are calibrating at 10mph, a +/- 1 mph differential is a
+/- 10%
factor, but if you are going at 70mph, that 1 mph differential
is now less than a 1.5% factor.
How to drive at a known
speed? Don't trust your car's speedometer. It may be using the same data the Scan Gauge is using, and
perhaps imperfectly displaying it on an analog dial.
The
most accurate speed measurement device is a GPS. If you
don't have one, see if you can borrow a friend's unit, or drive
alongside him if that is not possible. Or, with
good GPS units these days
costing $200 or less, maybe it is time to get yourself a GPS
unit too!
If you can't calibrate your
speed, don't worry. The unit is probably within a few
percent of being exact anyway.
Calibrating for fuel economy
This is a bit more
complicated, but well explained in the manual. Basically,
you fill your tank with gas, reset the fuel usage meter in the
unit, then drive until the tank is more or less empty, then
compare the fuel that you actually pump into the vehicle with
the fuel the gauge thinks you've used, and, same as with setting
the speed calibration, you then adjust the amount the gauge
thinks you've used to reflect the reality of how much fuel you
actually pumped into your car.
That's the theory of
calibrating your fuel usage. But the practicalities are
not quite as optimum as they are for calibrating the speed
setting. To be kind, normal gas station fuel pumps aren't
always 100% accurately calibrated - I know this for a certain
fact because I've sometimes filled my car with gas, and found, to my astonishment, that
the pump shows I've put maybe half a gallon of gas more into my
tank than its maximum rated capacity, with the tank having
some gas already in it when I pulled up to the pump.
In addition, different pumps
shut off at different points, so there's always a tenth of a
gallon or so of imprecision at determining the same fill level
as well as any error in the pump measuring how much gas it is
actually dispensing.
So what I do is I 'average'
a series of fillups. The first time, I set the gauge to
exactly the number the pump tells me. The next time, I
adjust the gauge to halfway between what it thinks and what the
pump says, and then I make a series of smaller adjustments until
it seems the pump amount is close to the amount shown on the
unit, sometimes a bit high and sometimes a bit low. You'll
probably end up with something that is accurate to within a few
percent.
Fortunately, getting this
absolutely exact is not very important. The key thing
remains unchanged - whether the absolute numbers are exact or
not, a higher mpg figure is always better than a lower one!
Throttle Position Zero setting
and other vehicle specifics
Setting the throttle zero
position is another very simple
trivial thing that you probably don't even need to worry about.
You can also set some
parameters like the capacity of your fuel tank (if you want to
use the unit's calculations for amount of fuel remaining and
likely distance you can travel on it - not something we
recommend you rely too closely on) and a few other things (like
if your vehicle uses gas, diesel, or is a hybrid), for which the
defaults seem to be perfectly fine most of the time.
If you want to be obsessive
(like I was!) read the short section in the manual and follow it
to get everything exactly right.
But the default setting seems to work perfectly for most
vehicles and applications.
Recalibrating
Note that once you've
calibrated the unit, it remembers its settings, even when it
loses power. And, if you switch the unit from one vehicle
to another, you'll need to recalibrate it for the new vehicle.
But, of course, if you're
just using it for its Check Engine diagnostics, you don't need
to bother about recalibrating the unit's measurement of speed
and fuel consumption.
If you are going to be using
it in a couple of different cars, you should write down the
calibration settings for each vehicle so you can just apply them
directly rather than needing to go through the full process of
recalibrating each time you swap the unit over.
How the ScanGauge has Saved me
Money
My Scan Gauge, which I've
had for only a month, has already saved me (and my friends!) its
purchase price ($160) and more besides.
Check Engine light savings
Firstly, the thing that
encouraged me to buy it was a Check Engine light coming on.
Now that my Landrover is no longer in warranty, such occasional
occurrences have grown from being a minor hassle to now being
also an appreciable financial
inconvenience.
My local Landrover
dealership charges a minimum fee of $115 (plus waste fee, taxes,
and who knows what else) just to decode the reason for the Check
Engine light coming on and to reset it, before adding on
whatever other charges apply for fixing the underlying issue
(which as often as not seems to be a faulty sensor!).
It turned out the
reason my Check Engine light was on was due to a high voltage
level being detected at one of the sensors. I remembered
that I'd left the keys in the ignition (switched off, but just
having the key in the ignition activates a bunch of standby
circuits that slowly drain the battery) over a weekend and on the Monday morning, had a dead
battery, and so had to recharge the battery. When the engine
first started after this, I had a high voltage event due to the charger and
then the alternator going into panic maximum charge mode.
So this was a totally benign error, and I simply pushed the
'Clear Fault' button and the light obediently switched off and
has stayed off ever since.
What a feeling of power that
was! I'd just saved myself something over $125, and I'd
solved the problem, myself, in a matter of seconds, rather than
having to take the vehicle in to the dealership for an entire
day, make other transport arrangements for the day, etc etc.
I subsequently saved a
friend a similar fee for their car which had a totally benign
Check Engine light on too.
Fuel Economy improvements
I've learned some
fascinating things since connecting the ScanGauge to my vehicle.
For example, when my car is
idling, it uses 0.6 gallons of gas per hour if the transmission
is in Drive, but only 0.46 gph if it is in Neutral. Who'd
have thought? So, if I'm stopped at a light, I'll push the
shift lever into Neutral.
Okay, so it would have to be
many many hours of idling to save much money on this small
saving. But, I also learned another thing. With gas
at $2/gallon, and the vehicle using about half a gallon an hour,
it is only costing me 1.5¢ for every minute the vehicle is
idling. So I'm no longer wondering/worrying if I should be
turning off the engine every time I'm stopped and then
restarting it a minute or two later. The stress on the
engine by stopping, letting it start to cool, then restarting it
again, is not worth a saving of a couple of pennies.
Here's another fascinating
thing I've learned. If I'm coasting downhill and put the
vehicle in Neutral, the engine burns about the 0.46 gph that it
does when idling. Okay - no surprise there. But -
get this : If I leave the engine in gear, the engine
switches off (many but not all modern engines will do this) and
so it burns 0
gallons per hour of gas. That's a new discovery for
me, and not something I'd have guessed. You'll get better
fuel economy leaving your car in gear and your foot off the gas
pedal than if you take it out of gear!
And, how about a third
'discovery' : Almost always, without exception, keeping
the car in a higher gear will massively reduce its fuel
consumption. I now will lock my car into top gear and
leave it in top instead of allowing the auto transmission to
shift between 4th, 5th and 6th gears during ordinary driving on
the freeway at freeway speeds. And when driving around
town, I manually shift gears at lower revs, sooner than the auto
transmission would do itself. And, so as not to overstress
the engine, I set one of the displays to tell me the engine
loading - the percentage of maximum power the engine can develop
that the engine is actually generating - once that starts to get
above 90% I'll downshift, but until then, I keep the vehicle in
as high a gear as possible.
So what does this all mean?
Well, you might think this number appalling, but I've got a
heavy SUV, and I'm delighted to see
that at present I'm averaging 20 mpg for the last 52.2 miles
I've driven since last filling the tank. This
was for a mix of freeway and around town driving, and when you
consider that the (usually ridiculously optimistic) EPA fuel
economy figures for my 2006 Landrover LR3 are 14 mpg mixed and 18
highway; getting 20 mpg is beating the odds by somewhere between
15% and 25%. That's a huge improvement in fuel
economy, with only very small changes in my driving habits.
All the Different Information
the ScanGauge can Show You
The unit has a small two
line LCD display (you can change the color of the back lighting
and adjust its brightness a whole bunch of different ways to
suit whatever color scheme you wish), and on this display it can
display four sets of data - one at each side of each line.
Real-time data
The unit comes
pre-configured with probably twelve different 'gauges' you can
select to display in each of the four different locations (I say
'probably' because not all vehicles report all twelve sets of
data) and which give real-time information about what is
happening under the hood.
By 'real-time' I mean
instantaneous data, which changes and is updated every second or
so (you can adjust the update rate if you wish), and this is
different to average data values (see the next subsection
below).
These twelve data values are
:
You might have some of this
data appear on instruments on your dash already (like mph and
rpm), and some of the information is of little general interest
to most of us, most of the time. Currently, I have two of the four gauges set to
tell me fuel economy and engine load, and I tend to play around
with what I show on the other two gauges. It has been
interesting to see some of the gauges for a while during my
researching the vehicle and how to get best economy from it, but
now I no longer need to be looking at, eg, gph data all the time
(which you can also calculate from mpg and mph data anyway, but
only when
the vehicle is moving). It has been interesting to see the
variation in ignition timing, and my next project will be to get
a feeling for the impact of using different fuel grades on
overall economy and performance, which will make this data again
relevant (as well as horsepower and torque figures - see the
next section).
Extra information from X-Gauge
programming
In addition to these twelve
data streams, you can program in extra data streams for
potentially as many as 25 more items, depending on what items
your car reports on.
This uses the unit's 'X-Gauge'
capability, where you follow instructions to define additional
gauges for things such as engine torque and horsepower, cylinder
head and transmission fluid temperatures, oil temperature and
pressure, barometric pressure, and, in the case of hybrid
vehicles, various information about the state of the battery as
well as the engine.
To add these extra data
streams, you need to program in some settings to the unit.
This is not particularly hard, and you simply follow the step by
step instructions provided by ScanGauge for what to program
depending on the make and model of vehicle you have, and after
doing so, you have now added the extra data monitoring.
Average values
In addition to the massive
range of real-time data the unit can display, it also holds a
series of averages for, eg, 'Current' (ie since the vehicle was
last started), 'Today', 'Yesterday', and 'Since Last Fill'.
This is using the unit in its 'trip computer' type role.
It can display eleven
different variables :
Some of these data points
are fairly useless, and of course, don't base your refilling
plans on when the trip computer says you're empty!
And some of the data points
might be a bit embarrassing (I'm thinking of the maximum speed
in particular).
The unit's implementation of
'today' and 'yesterday' values is massively flawed - it assumes
there is a change of day when it is switched off for about eight
hours - what it assumes to be an overnight. It would be a
very easy and inexpensive thing to add a true clock with local time to the unit
(hey - this would be another thing to display - current time!),
and then it would know exactly when days started and finished.
Maybe this will come out in a future version (this is, after
all, the ScanGauge II, and we informally believe there will be a
ScanGauge III one of these days).
Units
You can set the unit to use
liters or gallons, kilometers or miles, psi or kpa, and Celsius or
Fahrenheit. If you have a speedometer that isn't
calibrated in both km/hr and mph, this might be useful if, eg,
driving in Canada - you could set the ScanGauge to use km/hr and
pull up a speed display. Or, vice versa. If your
Canadian vehicle only shows km/hr and you're venturing south of
the border, you can pull up an mph display as one of the four
displays on the unit.
Using the ScanGauge with the
Check Engine Light
This is really wonderful.
You'll get a great feeling of power - after all, 'knowledge is
power' when you switch to this function.
Many of us have had the
misperception that the Check Engine light is warning us of some
imminent and grave disaster that is about to occur.
The reality is that most of
the time, the Check Engine light is only reporting a fault in the
vehicle's emission control system, and the problem it is
advising may be either temporary or trivial. Many cars
have a different warning light (or, alas, no warning light at
all) for major mechanical problems, and of course, with really
serious problems, no warning light is needed - your vehicle
simply stops working.
Do you really care if an
oxygen sensor is faulty (problem code P0133)? This may be something you need to
get fixed before an emissions test (if your State requires one)
but it isn't necessarily something that means you need to
urgently rush into the dealership right away to get immediately
fixed. On the other hand, if you are told that you've a
misfire on multiple cylinders (problem code P0300), that is
probably something you should respond to sooner rather than
later.
Now, with the ScanGauge, you
can get it to tell you what the fault codes in the engine are
which have caused the light to come on, and then, best of all,
you can turn the light off again if you don't enjoy its little
light shining at you on the dash all the time.
This gives you great peace
of mind. No longer is a Check Engine light a mysterious
and worrying sign on your dashboard.
Note that the ScanGauge will
just report a code - usually a letter and then a two, three or
four digit
number. You'll then need to find out what the code means,
and don't bother looking in your Owner's Manual, because you
won't find it there.
Instead, go to a website
like
www.troublecodes.net or
www.obd-codes.com or
www.check-engine-light.com and look up the code there.
It will tell you what you want to know, and if you're still
unsure, try calling the dealership and saying 'Oh, my --- is
showing as ---, is that a problem or can it wait until I'm next
bringing the vehicle in for servicing?'. They'll probably
want to encourage you in as soon as possible (they've got a
living to make, after all) but a bit of careful questioning as
to how exactly the car is being harmed by the fault condition
should soon reassure you.
Using the ScanGauge in General
The unit is simple and easy
to use, and displays its data reasonably clearly on the LCD
screen.
Controls are intuitive, and
the only problem you're likely to have is remembering what all
the different gauge types are as you switch from one option to
the next to the next. For that reason, I keep the manual
in the car with me.
Be careful not to become too
distracted by the unit and the up to four constantly changing
sets of data it can show simultaneously. Mount the unit
somewhere where you don't have to shift your focus too far from
the road ahead to the unit, and remember the most important
thing is to concentrate on driving, not on the ScanGauge.
Other Similar Products
There are plenty of other
units that can be connected to your vehicle's OBDII port,
ranging from 'test bench' type diagnostic and programming units to similar
multipurpose consumer focused units similar to the ScanGauge.
None of the other units out
there seem to be any better than the ScanGauge for general use,
and all are appreciably more expensive.
You can also get software
that runs on personal computers that will do the same type of
thing as these dedicated devices if you just want to diagnose
and reset your Check Engine light. This software is
usually considerably less expensive, but it is also considerably
less convenient than the nice little self contained ScanGauge.
Summary
The ScanGauge II is a handy
useful device that will help you drive more economically, gives
you a wide range of additional information about the functioning
of your vehicle, and
can save you the sometimes unnecessary cost and worry when your
Check Engine light comes on.
It has a list price of
$169.95, and can be purchased at
Amazon for $10 less. We
recommend also getting a second cable, which lists for $19.95
and is available on Amazon for $12.95.
for $10 less. We
recommend also getting a second cable, which lists for $19.95
and is available on Amazon for $12.95.
If this sounds like the sort
of thing you'd like, you almost certainly will like it, just as
I do. Recommended.
Related Articles, etc
|
If so, please donate to keep the website free and fund the addition of more articles like this. Any help is most appreciated - simply click below to securely send a contribution through a credit card and Paypal.
|
Originally published
6 Feb 2009, last update
21 Jul 2020
You may freely reproduce or distribute this article for noncommercial purposes as long as you give credit to me as original writer.
|