The
Ranges at Front
Sight
A review of my training experience
|
|
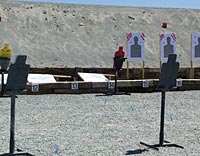
A view of Front Sight
range 1A with a mix of 'one on one' steel targets, paper
targets on timed turners, and steel plates up on the berm.
Part of a series on the Front
Sight Firearms Training Institute; what it does, how it does
it, and its relevance for you. Please click the links
on the right hand side for other parts of the series. |
Short of shooting at each other
(something which is done in advanced courses with special
non-lethal 'Simunition' rounds) Front Sight does all it can to
make range work demanding and extending.
Various types of shooting
scenarios were acted out on several different ranges, and by
adding time pressures and requiring some evasive movement
actions on our part as well, the range practice became more
valuable and more extending.
About the Ranges
Most of the course was
conducted out on the ranges, with occasional class-room lectures
in their main lecture hall, a large room which could hold up to
412 people, and laid out with tables and chairs to allow us to
take notes, eat lunch, or whatever else.
Our range had twenty firing
positions or lanes, and had lines to mark out distances of 3
meters (ie 10 ft), 5 meters (16.5 ft), 7 meters (23 ft), 10
meters (33 ft) and 15 meters (50 ft). It was surrounded by
high dirt berms on two sides, a high block wall on another side
and a block wall with two openings in it at the back for people
to come and go. It had a small roofed area near the back
which gave some shade, depending on where the sun was in the
sky, and there were seats and tables at the back.
The rear part of the range
had a concrete floor, the front part (up to the 15 meter line)
had gravel.
Front Sight has I'm not
quite sure how many of these pistol ranges (perhaps 15) plus a
number of rifle and shotgun ranges, and some specialty ranges
(described below).
Lane/Student Ratio
We had a group of forty
people, so each lane was shared by two students.
This might sound like we
were short-changed in terms of each person being able to have
complete access to a firing position all the time, but it
actually worked to our advantage, because we needed 'down time'
to reload, to hydrate, to go to the toilet, and to just
relax/recuperate.
During some of the more
intensive activities, we would be alternating between shooting
and reloading/hydrating, with no extra spare time for anything
at all except an occasional rushed toilet break. We
couldn't have used the extra time if the ratio of range lanes to
students was greater.
The 2:1 ratio was perfect, and also
allowed the 'coach/student' approach mentioned in the section
about Front Sight
Instruction in the section on instructors.
The Targets and Turners
Most of the time we were
shooting paper targets that had a black silhouette more or less
resembling a head and body, set on a white paper background.
Inside the silhouette was a
thinly outlined chest area - the thoracic cavity - which was our
aiming objective, and a very much smaller area outlined in
the head - the 'cranial ocular cavity' - which was our alternate aiming point in 'Failure to
Stop' scenarios.
We were taught to fire two
aimed rounds to the thoracic cavity, and if that failed to stop
an aggressor, we were then taught to fire a third round to the
head area.
This is perhaps a
controversial and not universally accepted technique that has
overtones of political correctness associated with it. If
you read any report of a police shooting, you'll see they fire
many more than two shots at a time, and reportedly the FBI are
trained to empty their entire magazine as quickly as possible
without pausing when in an encounter requiring the use of deadly
force.
In reality, two rounds to
the thoracic cavity may indeed succeed in stopping an
adversary's attack, but it may not succeed in
immediately/instantly stopping their attack, particularly if the
bad guy is high on drugs. You'll have to make an instant
decision after firing the first two rounds whether or not to
continue firing into the thoracic cavity, or switch to head
shots, or stop shooting due to the bad guy ceasing to present a
deadly threat.
Particularly when a bad guy
is close and rapidly coming towards you, it is common practice
to simply keep firing as many rounds as you can, as quickly as
you can, until the person stops their advance and collapses.
Occasionally we used 'photo
realistic' targets - pictures of people in a variety of
situations, some with weapons pointed at us, and others in more
ambiguous poses, and part of this practice was to determine
which situations would require/justify lethal force and which
were not yet at that terrible situation.
The targets were mounted on
turners - platforms that could quickly rotate 90°
so as to have the target either squarely facing us or else
turned away on a profile view which resulted in no visible
target. The turners could be controlled either manually by
the instructor, or on an automatic timer so that they would
rotate open when triggered by the instructor, then would rotate
closed again after a predetermined time period.
In
addition, the turners could be either enabled or disabled, so
that some when the turners were activated, some targets would
turn and others would not turn.
As
things became more intense and the times to shoot at targets
were reduced, some people found it too challenging to try and
shoot aimed shots at the targets under the time pressure and
they chose to instead do the drills against untimed non-turning
targets, and the range master simply altered the number of
targets that were turning and not turning to suit the varying
number of people who wanted each different scenario.
Update 2011 : The Four Day Defensive Handgun course is
no longer done on ranges with turning targets. See our 'Front
Sight Course Update' for news on what has changed for 2011.
Other Range Targets
Most of the training was
with these paper targets, one target per lane. But on
occasion we were given multiple target training - a more
realistic scenario, with our range master repeating over and
over the fact that 'rats hunt in packs' - and as a person who
had been a prison guard for much of his life, he was certainly
an expert on criminals and their habits.
And so for one stage of our
training we were being told to engage multiple targets
simultaneously, with unpredictable combinations of targets, and
suddenly announced 'failures to stop' requiring us to urgently
switch from 'center of mass' shots to aimed head shots.
That was intense.
Hostage Scenarios
At the end of our formal
training and after completing our testing, we had one final set
of drills to conduct. This time we had targets that showed
a central silhouette with two half heads on either side of the
main central silhouette. We actually had to write the name
of a loved one on the central silhouette, and were told that the
two half heads on either side of the main head were two bad
guys, holding our loved one at gunpoint and demanding we drop
our weapon, failing which, the bad guys would shoot the person
they were holding hostage.
Our mission - to shoot the bad
guy in the half of his head which was visible, while not harming
the person near and dear to us.
Wow. Imagine that, if
you can. There was only one situation in the entire four
days more stressful than that (see 'Specialty Ranges' below).
We were at a range of 5 meters (16.5 ft) and told to take five
careful aimed shots at the left hand half head. After
completing that, we did 'dry firing' practice on the right half
head, and then took five shots at that one too.
One on One Competition
To introduce an extra
element of pressure and tension, the range was set up with two
sets of three metal targets. Each set comprised a two part
target - the first part being a full head and body silhouette,
and a very much smaller part on one side of the head which was
the target, the rest of it being a hostage that we had to avoid
shooting while aiming at what was intended to represent a 'bad
guy' hiding behind the hostage. The second and third
targets were more distant regular targets which we had to
hit, more or less anywhere, in order to trip them.
Two people would come up to
the two sets of targets and would then shoot their way through
them simultaneously, the first person to hit all three targets
being the winner, but (of course) if your shot(s) at the first
target hit the innocent person rather than the bad guy behind,
you were disqualified.
It was an interesting
experience to shoot 'against' other group members, and after the
first round, the winners then played off against each other, and
so on until one person emerged as best of the group.
Specialty Range - Doors
We were also taken to two
specialty ranges. The first specialty range involved a
series of doors in door frames, and was used together with a
practice gun to develop skills for moving through a house and
going through a closed door and into a room when in a situation
against an intruder.
This was an interesting
experience, although a bit academic and very stress-free, other
than the self-induced stress of wanting to do well and trying to
imagine it was a 'for real' experience. I certainly
learned a very valuable and perhaps life saving lesson from the
experience however, so it was time well spent.
Now for the second specialty
range. If the first was stress free, this one massively
compensated for it with stress in abundance.
Specialty Range - Mock House
The second specialty range
was a mockup of a house. We arrived at the front of the
house with a front door, closed, and knew nothing about what
would confront us inside. We were told we had just
returned home, driven up the driveway, and as we were doing so,
we saw some masked intruders grab our spouse and take her inside
the house. We had called the police, but they were not
expected to arrive for about 30 minutes, and so it was up to us
to resolve the situation.
We had our real loaded
weapon, and one or two instructors closely following us, one chained to
the back of our belt, the other behind him, and were told very
very clearly not to shoot behind us, and to remember the
instructors were our friends! And then it was up to us to
open the front door and confront whatever evils lurked therein.
Reacting to the surprises
inside was excellent training, and I'm not going to spoil it for
you by telling you what to expect inside, other than to clarify
one point that was not made clear prior to going into the house
myself. You can talk to the representations of people you
encounter inside the house. Ask your instructors - or tell
your instructors - how you'll react/respond to what you see
inside, and define the scenario in advance so you know what to
expect and what to do.
That's all the hints you'll
get from me. However, I can tell you that this was the
most extremely ultimately stressful thing I have ever, ever,
encountered in my entire life to date (even more stressful than
bungy jumping). The targets might
have been mainly static inanimate black and white pictures on
paper, but I was living the moment and for me, it was all 100%
real.
We had been taught, right
from the start of day one, that when reholstering our pistol
after any firing to pause and let out a deep breath before
gently making the final vertical movement of the pistol into the
holster. This was, we were told, because we'd be anxious,
excited, and in a trembling mix of fear and adrenaline at the
end of an encounter. Most of us forgot this immediately,
and people were triumphantly and dangerously ramming their
weapons back in their holsters at the end of simple short range
experiences (holstering your weapon is one of the most dangerous
things you can do with it; many/most negligent discharges occur
during this phase of weapons handling).
But at the end of the
shooting session in the mock house, I was hyper-ventilating and
trembling and massively tense and keyed up. I hadn't
noticed any of this as I was going through the house, and I
performed quite well, but at the end of the action, I felt like
my head was about to explode or something similar, and I then
understood the wisdom of the admonishment to pause, take a deep
breath, and be very slow and careful in reholstering at the end
of an encounter.
Unfortunately we only got to
go through this experience once. It was a profound
learning experience and we all would have loved a chance to
repeat it.
Night Practice
Statistics show that a
person is more likely to use their pistol in self defense at
night rather than during the day. And so it was a valid
and essential part of our training to have a night firing drill
on the range, learning some of the basics about how to
tactically use a flashlight to best advantage, and how to
co-ordinate holding and controlling a flashlight in one hand and
a pistol in the other hand.
This was a completely
realistic
exercise, held at night, and with no supplemental or other
lights. We were in the dark - quite literally - except for
when we were told to illuminate targets. We had to load
and unload our weapons in the dark, clear jams in the dark, and
do everything in the dark, as well as, of course, shoot in the
dark.
This started off at a
'normal' pace, but climaxed in an overwhelming overload of
targets appearing and disappearing, with instructors calling out
commands at us, piling more and more pressure on us, and the
clear desert night air became overloaded with smoke from
repeated rapid firing. It was another overwhelming
experience that forced us to build some stamina way beyond that
you get from simply shooting at a single static target, one shot
at a time, in a leisurely manner.
It also showed us an
interesting thing. Some people had a brand of electronic
ear hearing protectors that had softly glowing red lights on
them to show they were switched on. None of us had
realized this during the day sessions, but all of a sudden, at
night, we found some of the group had little glowing red lights
indicating where they were.
The really dangerous part of
this was that the people with these hearing protectors didn't
know they glowed themselves until the rest of us told them.
Imagine if they were creeping around their house at night, in
conflict with intruders, trying to be stealthy but all the time,
without realizing it, they had two red lights to indicate the
sides of their head! Who do you think would win that
encounter?
Which reminds me - tritium
night sights? Dubious idea. They are good for an hour or
two at dusk and dawn, but add no value during the day, and in
the dark of night, you end up again carrying something with
three glowing dots that may help the bad guys see where you are
(if they happen to be behind you or obliquely off to one side -
if in front, they are unlikely to see the sights).
Update 2011 :
This is no longer included in the standard Four Day Defensive
Handgun course. See our page
Updates on Front
Sight's Courses for more information.
After Action Drills
We didn't just walk up to
the distance line on the range, shoot at targets, then walk back
again. After every shooting engagement, we were taught to
conduct two types of after action drills.
Tactical Reloads
We were continually being
reminded that any time we had expended ammunition, we should
exchange magazines as soon as time and circumstances safely
allowed, replacing the partially depleted magazine with a more
fully loaded one, 'just in case'.
Some people became excellent
at doing this all the time. But invariably some people
would forget - particularly in the more stressful events - with
the predictable result that at a moment of extreme need, they'd
find themselves with an empty weapon. That is why we are
taught to reflexively, always, do a tactical reload at any lull
in the situation, so as to hopefully, in a stressful
environment, do it automatically to prevent running out.
Tactical Movements
In a real situation, you'd
never stand still, presenting the other side with an easy
stationary target. You'd be on the move all the time.
This was clearly impractical
on a 20 person range, but we were still taught a modified
version of such movements, including stepping aside after every
engagement, scanning the area for other opponents (our
instructors kept stressing that if we were to end up in a bad
situation, the overwhelming preponderance of scenarios would see
us having to confront multiple adversaries, some of whom might
be trying to sneak up on us from the sides or behind), checking
that our opponent was truly down, and so on.
Maybe this was the one
lesson we could truly learn from movies. We've all seen
movies where the good guy lets his guard down and an unexpected
extra bad guy sneaks up from behind and gets control of the
situation. Hopefully our after action drills will make
that less likely to happen to us.
More Advanced Ranges
For students taking advanced
classes, there are other ranges with more challenging
environments, allowing students to practice through tunnels and
in more urban type settings, in various positions and even in
multi level buildings (stairs, we are told, are one of the most
challenging tactical situations to encounter).
These offer yet another
reason to come back for more courses in the future!
Part of a multi-part series
Please click the links at
the top right of this page to read through
other parts of this extensive series on Front Sight and the
training they offer.
Related Articles, etc
|
If so, please donate to keep the website free and fund the addition of more articles like this. Any help is most appreciated - simply click below to securely send a contribution through a credit card and Paypal.
|
Originally published
11 Sep 2010, last update
30 May 2021
You may freely reproduce or distribute this article for noncommercial purposes as long as you give credit to me as original writer.
|